该应用程序的主要内容是NavigationStack中的ProductListView。我在工具栏中添加了“选择类别”按钮。
struct ContentView: View {  @StateObject var fetcher = ProductFetcher()  var body: some View {
 NavigationStack(root: {
 ProductListView(products: fetcher.products,
 state: fetcher.state)
 .toolbar {
 ToolbarItem {
 Button {  } label: {
 Label("Choose Category", systemImage: "line.3.horizontal.decrease.circle")
 }
 }
 }  .onAppear {
 fetcher.load()
 }
 .navigationDestination(for: Product.self, destination: { product in
 ProductDetailView(product: product)
 })
 })
 }
}
为了在工作表中显示ProductCategoryListView,当用户点击“选择类别”按钮时,我首先必须声明一个状态属性并切换它。
struct ContentView: View {
    @State private var showCategorySelector: Bool = false
    @StateObject var fetcher = ProductFetcher()

    var body: some View {
       ...
       .toolbar {
             ToolbarItem {
                    Button {
                        showCategorySelector.toggle()
                    } label: {
                        Label("Choose Category", systemImage: "line.3.horizontal.decrease.circle")
                    }
                }
            }
   }
}
然后,我可以使用.sheet修饰符并将相应的@State属性绑定到showCategorySelector参数:
struct ContentView: View {
    @State private var showCategorySelector: Bool = false
    @StateObject var fetcher = ProductFetcher()

    var body: some View {
        NavigationStack(root: {
             ...
        })
         .sheet(isPresented: $showCategorySelector) {
            ProductCategoryListView(selectedCategory: $fetcher.selectedCategory)
        }
    }
}
现在,用户可以选择一个类别,但产品列表不会更新。当工作表关闭时,我希望更新产品列表并仅显示所选类别中的产品。可以使用参数onDismiss在工作表被驳回时执行代码。在下面的示例中,我重置products数组并调用load(),后者执行对Fake Store API的获取请求:
.sheet(isPresented: $showCategorySelector, onDismiss: {
     fetcher.products = []
     fetcher.load()
}) {
    ProductCategoryListView(selectedCategory: $fetcher.selectedCategory)
}
通常需要切换多个不同的视图。在购物应用程序示例中,我可以添加另一张显示设置视图的工作表。
struct ContentView: View {
    @State private var showSettings: Bool = false
    @State private var showCategorySelector: Bool = false
    @StateObject var fetcher = ProductFetcher()

    var body: some View {
        NavigationStack(root: {
             ...
        })
        .sheet(isPresented: $showCategorySelector, onDismiss: {
             fetcher.products = []
             fetcher.load()
        }) {
            ProductCategoryListView(selectedCategory: $fetcher.selectedCategory)
        }
        .sheet(isPresented: $showSettings) {
            SettingsView()
        }
    }
}
图纸也适用于绑定到选定项目。如果要显示List或ForEeach中项目的工作表,这将非常有用。下面是一个简单的例子:
struct ContentView: View {
    @State private var products = [Product(id: 1,
                                title: "Fjallraven - Foldsack No. 1 Backpack, Fits 15 Laptops",
                               price: 9.95,
                               description: "Your perfect pack for everyday use and walks in the forest.",
                               category: "men's clothing",
                               image: "https://fakestoreapi.com/img/81fPKd-2AYL._AC_SL1500_.jpg",
                               rating: Rating(rate: 3.9, count: 120)), ...]

    @State private var selection: Product? = nil

    var body: some View {
        List(items, selection: $selection) { product in
            ProductRow(product: product)
                .tag(product)
        }
        .sheet(item: $selection,
               onDismiss: { print("finished!") },
               content: { ProductDetailView(product: $0)
        })
    }
}
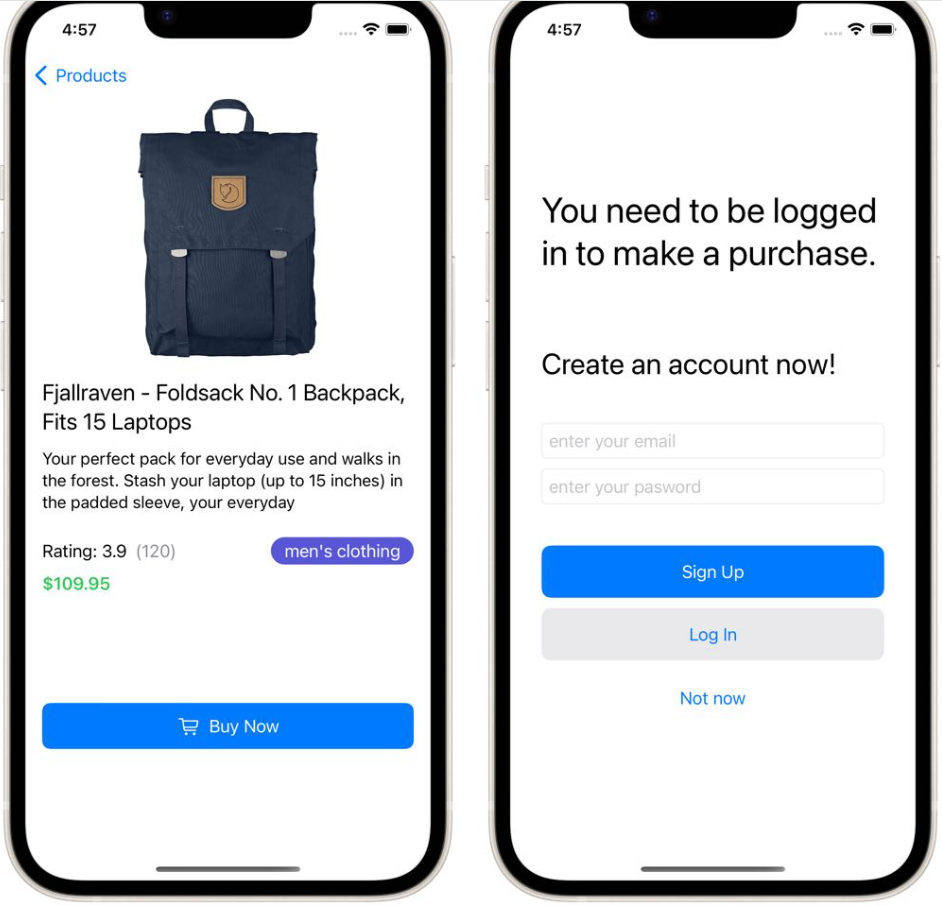
要使用fullScreenCover()呈现全屏模式视图,请将.fullScreenCove修饰符添加到要从中呈现的视图,使用isPresented绑定提供可选条件,然后提供要呈现的视图。在购物应用程序示例中,我有一个带有购买按钮的详细视图。当用户我没有登录时,我想全屏显示登录屏幕:
struct ProductDetailView: View {

    let product: Product
    @State private var showAuthView = false

    var body: some View {
        VStack {
                ...

                Button {
                    // check if logged in, otherwise
                    showAuthView.toggle()
                } label: {
                    Label("Buy Now", systemImage: "cart")
                        .frame(maxWidth: .infinity)
                        .padding(5)
                }
                .buttonStyle(.borderedProminent)
                .frame(maxHeight: .infinity)
            }
        }
        .fullScreenCover(isPresented: $showAuthView) {
            AuthenticationView()
        }
    }
}

当用户点击“立即购买”按钮且未登录时,验证视图将显示在全屏中
到目前为止,我应该给你床单和全屏封面。两者都完全覆盖了主视图。但有时您希望显示半页,并允许用户查看部分主要内容。在产品列表示例中,我只能在底部的半页中显示类别选择屏幕。您现在可以使用presentationDetents来完成此操作,它适用于iOS 16+和macOs 13+。presentationDetents修改器需要放置在图纸内部。以下是如何将其添加到ProductCategoryListView:
struct ContentView: View {
    @State private var showCategorySelector: Bool = false
    @StateObject var fetcher = ProductFetcher()

    var body: some View {
        NavigationStack(root: {
             ...
        })
        .sheet(isPresented: $showCategorySelector, onDismiss: {
             fetcher.products = []
             fetcher.load()
        }) {
            ProductCategoryListView(selectedCategory: $fetcher.selectedCategory)
                .presentationDetents([.medium])
        }
    }
}

如果提供多个图纸尺寸,用户可以拖动图纸指示器来更改图纸尺寸。上图中的配置是通过以下方式完成的:
.presentationDetents([.medium, .large, .fraction(0.8), .height(200)])
以下是detents的配置:
高度:以点为单位给出绝对高度
打开工作表时,它将以最小的显示尺寸显示。如果要设置特定的大小,可以使用到选择属性的绑定:
struct ContentView: View {
  @State private var showCategorySelector: Bool = false
  @StateObject var fetcher = ProductFetcher()
  @State private var currentDetent = PresentationDetent.large

  var body: some View {
      NavigationStack(root: {
           ...
      })
      .sheet(isPresented: $showCategorySelector, onDismiss: {
           fetcher.products = []
           fetcher.load()
      }) {
          ProductCategoryListView(selectedCategory: $fetcher.selectedCategory)
             .presentationDetents([.medium, .large, .fraction(0.8), .height(200)],
                                   selection: $currentDetent)
      }
  }
}
这也可以用于以编程方式调整sheet的大小。例如,您可以根据当前选定的类别来选择高度。
ProductCategoryListView内部有一个List。列表和图纸都会对向上/向下滑动手势做出反应。SwiftUI需要决定谁将对手势做出反应。默认情况下,图纸可以通过手势来调整大小。在我的例子中,我希望允许用户在类别列表中滚动。这可以通过较新的演示文稿ContentInteraction来完成
.sheet(isPresented: $showCategorySelector) {
     ProductCategoryListView(selectedCategory: $fetcher.selectedCategory)
        .presentationDetents([.medium, .large, .fraction(0.8), .height(200)], selection: $currentDetent)
        .presentationBackgroundInteraction(.enabled(upThrough: .height(200)))
        .presentationContentInteraction(.scrolls)
}
默认情况下,当图纸处于打开状态时,不能与图纸后面的视图交互。使用iOS 16和macOS 13,您现在可以使其可交互。下面是一个使用新presentationBackgroundInteraction修饰符的示例:
.sheet(isPresented: $showCategorySelector) {
   ProductCategoryListView(selectedCategory: $fetcher.selectedCategory)
       .presentationDetents([.medium, .large, .fraction(0.8), .height(200)], selection: $currentDetent)
       .presentationBackgroundInteraction(.enabled)
}
这将始终允许与以下视图进行交互。如果您只想对特定尺寸的图纸启用此功能,您可以进一步自定义presentationBackgroundInteraction,如下所示:
.presentationBackgroundInteraction(.enabled(upThrough: .height(200)))
在当前的购物应用程序示例中,这可能没有意义。当用户点击列表中的产品时,会打开详细信息视图。
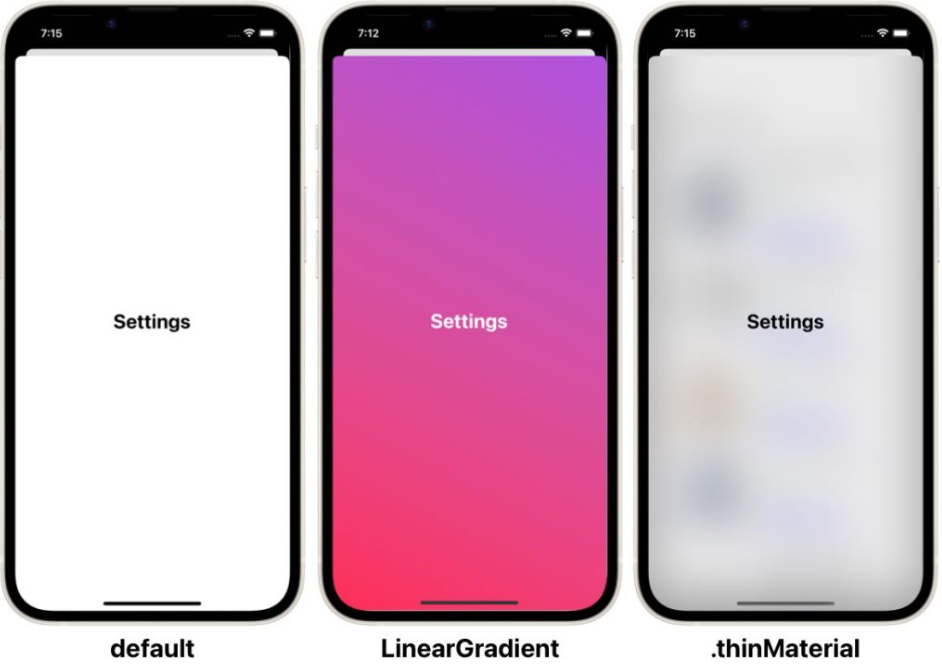
使用iOS 16+和macOS 13+,您现在可以更改工作表的背景颜色。以下是将presentationBackground与渐变背景一起使用的示例:
.sheet(isPresented: $showSettings) {
SettingsView()
.presentationBackground(alignment: .bottom) {
LinearGradient(colors: [Color.pink, Color.purple], startPoint: .bottomLeading, endPoint: .topTrailing)
}
}
也可以使用材质背景使Sheet半透明:
.sheet(isPresented: $showSettings) {
SettingsView()
.presentationBackground(.thinMaterial)
}

125/1000
实时翻译
板材的拐角半径:
划译
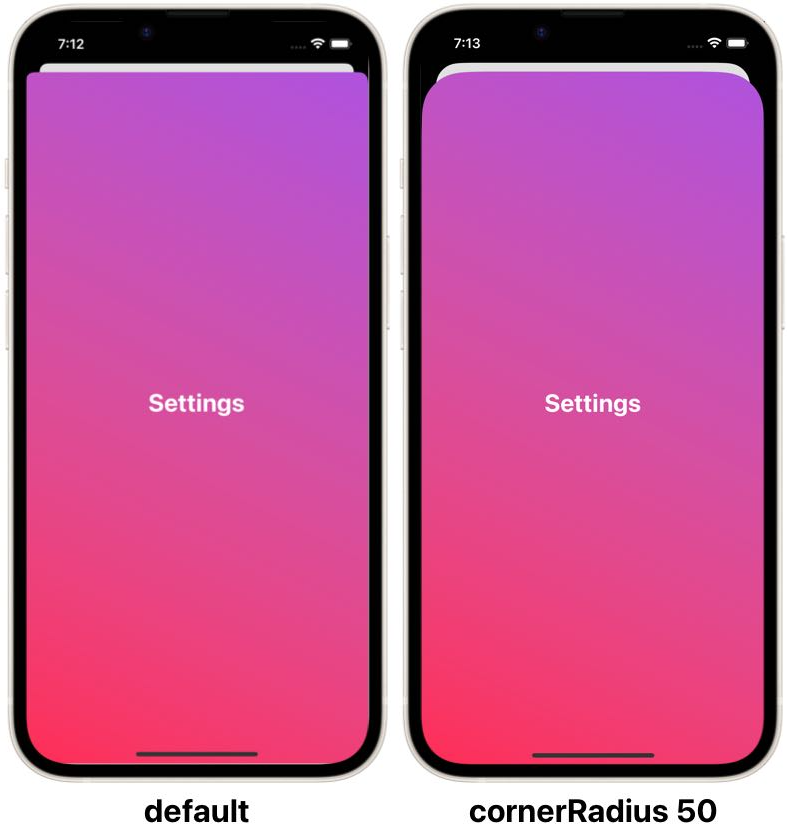
presentationCornerRadius修饰符也可用于iOS 16+和macOS 13+。这将更改Sheet的圆角半径:
.sheet(isPresented: $showSettings) {
     SettingsView()
          .presentationBackground(alignment: .bottom) {
                LinearGradient(colors: [Color.pink, Color.purple], startPoint: .bottomLeading, endPoint: .topTrailing)
          }
          .presentationCornerRadius(50)
}

可以通过向下滑动手势来取消工作表。如果要防止这种情况发生,请使用新的interactiveDismissDisabled修饰符:
.sheet(isPresented: $showSettings) {
 SettingsView()
 .interactiveDismissDisabled()
}
FullScreenCover不允许向下滑动以关闭。您必须添加按钮以允许用户以编程方式关闭图纸。使用环境值dismiss:
struct ProductCategoryListView: View {  @StateObject private var categoryFetcher = ProductCategoryFetcher()
 @Binding var selectedCategory: String?
 @State private var searchText = ""
 @Environment(\.dismiss) var dismiss  var categories: [String] {
 guard !searchText.isEmpty else { return categoryFetcher.categories }  return categoryFetcher.categories.filter { category in
 category.lowercased().contains(searchText.lowercased())
 }
 }  var body: some View {
 NavigationView {
 List(selection: $selectedCategory){
 ForEach(categories, id: \.self) { category in
 Text(category)
 }
 }
 .navigationTitle("Select a Category")
 .navigationBarTitleDisplayMode(.inline)
 .toolbar(content: {
 ToolbarItem {
 Button {
 dismiss()
 } label: {
 Label("Dismiss", systemImage: "xmark.circle.fill")
 }  }
 })
 .searchable(text: $searchText)
 .onAppear {
 categoryFetcher.loadPoductCategories()
 }
 }
 }
}
Dismiss适用于所有系统演示,包括工作表、全屏封面或弹出窗口。在NavigationView中,它还将弹出当前视图,这意味着导航回根视图。
总之,SwiftUI提供了一种多功能的方式来创建模式视图,如sheets、fullScreenCovers等。表格对于显示附加内容或提示用户输入而无需离开主界面特别有用。这篇博客文章探讨了SwiftUI中图纸的各个方面,包括显示Sheet、使用多张Sheet、控制Sheet高度、自定义外观和dismissing sheet。通过利用这些技术,开发人员可以创建增强整体用户体验的动态和交互式用户界面。
原文:SwiftUI Sheet: Modal, Bottom, and full screen presentation in iOS