在这篇文章中,我们测试了一个面罩探测器在普通电脑上。
在这里,我们让TensorFlow Lite能够理解我们的模型,TensorFlow Lite是TensorFlow的轻量级版本,专门开发用于在小型设备上运行。
介绍
在本系列的前一篇文章中,我们训练并测试了用于面罩检测的YOLOv5模型。在本例中,我们将把模型转换为TensorFlow Lite格式。
我之前提到过,我们将使用一些在官方的Ultralytics repo(克隆这个)中仍然不可用的脚本来简化我们的生活。要执行转换,我们将使用tf.py公司脚本,它简化了PyTorch到TFLite的转换。否则,我们就需要坚持Ultralytics建议的方法,将PyTorch转换为ONNX,将TensorFlow转换为TFLite。请注意,最后一个操作可能会失败,这确实令人沮丧。
要执行转换,请运行以下命令:
 import tensorflow as tf
print(tf.__version__)
!PYTHONPATH=. python3 /content/yolov5/models/tf.py --weight
/content/yolov5/runs/train/exp2/weights/best.pt --cfg models/yolov5s.yaml --img 416 --source /content/FaceMaskDataset/images/train
用于权值转换的Ultralytics-Suggested法
从我的角度来看,这个步骤有点麻烦,但是有必要展示它是如何工作的。不要运行前面的命令,而是运行以下行:
 # Uncomment all this if you want to follow the long path
#!pip install onnx>=1.7.0 # for ONNX export
#!pip install coremltools==4.0 # for CoreML export
#!python models/export.py --weights /content/yolov5/runs/train/exp2/weights/best.pt --img 416 --batch 1 # export at 640x640 with batch size 1

#!pip install tensorflow-addons
#!pip install onnx-tf
#!pip install tensorflow==2.3.0

#import tensorflow_addons as tfa
#import onnx
#from onnx_tf.backend import prepare
#import tensorflow as tf
#print(tf.__version__)

#base_model = onnx.load('/content/yolov5/runs/train/exp2/weights/best.onnx')
#to_tf = prepare(base_model)
#to_tf.export_graph("/content/yolov5/runs/train/exp2/weights/customyolov5")

#converter = tf.compat.v1.lite.TFLiteConverter.from_saved_model('/content/yolov5/runs/train/exp2/weights/customyolov5')
#tflite_model = converter.convert() #just FYI: this step could go wrong and your notebook instance could crash.
在Google Colab上测试TFLite权重
现在是时候检查重量转换是否顺利了。在此之前,我们需要稍微修改检测.py编写脚本并设置正确的类名。打开文件(/content/yolov5)/检测.py),在第157行中查找names=[…],并将其更改为names=['Face mask','No Face mask']。保存并关闭文件。
如果一切顺利,你应该能够加载和测试你得到的。把下面的台词写下来。他们将用.tflite权重加载YOLOv5模型,并对存储在/test\u images的图像运行检测。
!python detect.py --weight /content/yolov5/runs/train/exp2/weights/best-fp16.tflite --img 416 --source ../test_images

那样,你就做好了-至少在这个笔记本里!最后一步,下载存储在/content/yolov5/runs/train/exp/weights/best-fp16.tflite和最佳.pt在实际实现中使用它们。
TFLite解释器在边缘设备上具有良好的性能
约洛夫5号detect.py脚本使用常规的TensorFlow库来解释TensorFlow模型,包括TFLite格式的模型。在我们的场景中,TensorFlow过于繁重,并且需要在小型设备上运行。如果您想保持良好的检测性能,最好使用TFLite及其解释器。我基本上已经用它们的TFLite等价物替换了所有与TensorFlow相关的操作。此外,我做了一些小的修改,使检测器能够在TPU/GPU上运行:我复制了检测.py文件,对其进行了修改,并将其保存为detect4圆周率. 你可以在这里找到文件。我邀请您比较这些文件,以充分了解修改。
局部测试YOLOv5模型权重
此步骤是可选的,但建议执行。在这个简短的测试中,我将向您展示如何在最终部署到Pi之前将计算机的网络摄像头输出提供给检测器。我还将向您展示如何使用和不使用TFLite解释器测试模型。一旦你有了修改过的侦探4圆周率文件,在本地计算机上创建一个名为“面罩检测”的文件夹。
从任何CLI窗口运行pip3 install torch torchvision,获取最新的PyTorch版本及其依赖项。
从已创建的目录启动Jupyter笔记本:打开CLI,导航到该文件夹,然后发出Jupyter Notebook命令。一旦笔记本弹出,运行以下单元格:
 #Install the appropriate tensorflow version
!pip install tensorflow==2.3.1
import torch #It's required by YOLO
import tensorflow as tf
!git clone https://github.com/zldrobit/yolov5 #comment this if this is not your first run
%cd yolov5
!git checkout tf-android
print(tf.__version__)

#Install all dependencies indicated at requirements.txt file
#Prompt if any GPU is available
!pip install -r requirements.txt
print('All set. Using PyTorch version %s with %s' % (torch.__version__, torch.cuda.get_device_properties(0) if torch.cuda.is_available() else 'CPU'))
在继续之前,请记住修改检测.py将所有下载的权重归档并复制到YOLOv5文件夹中的/weights文件夹中。
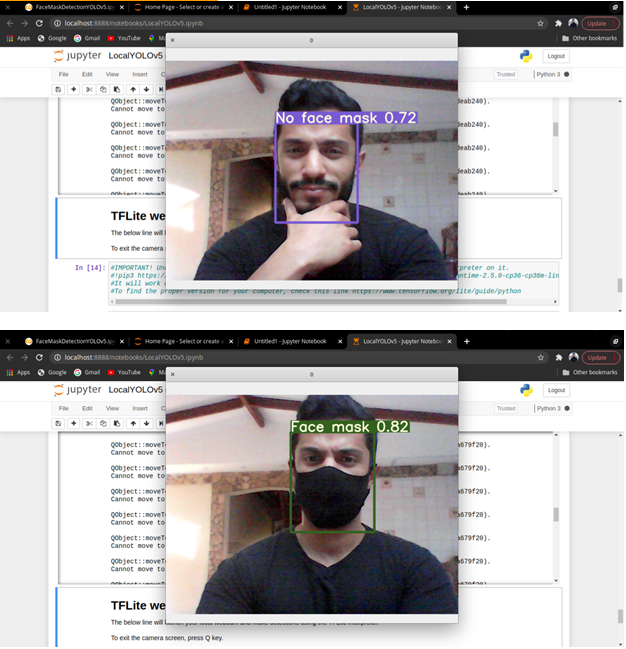
要向YOLOv5型号提供计算机的网络摄像头,请在新的笔记本单元中运行以下命令:
!python detect.py --weights weights/best.pt --img 416 --conf 0.4 --source 0 --classes 0 1
它将在一个单独的窗口启动网络摄像头,识别你的脸,并检测你是否戴着口罩。这是你应该期待的:
如果要使用TFLite权重测试模型,首先需要在机器上安装相应的解释器。
如果你使用linux x86_64:
pip3 https://github.com/google-coral/pycoral/releases/download/release-frogfish/tflite_runtime-2.5.0-cp36-cp36m-linux_x86_64.whl如果你使用其他操作系统,我建议你检查一下最好的版本。
现在,您可以运行下一个单元格并期望得到与之前完全相同的结果:
!python detect4pi.py --weights weights/best-fp16.tflite --img 416 --conf 0.45 --source 0 --classes 0 1下一步
我们已经训练并测试了YOLOv5面罩探测器。在下一篇文章中,我们将按照承诺在Raspberry Pi上部署它。敬请期待!