基本阴影贴图
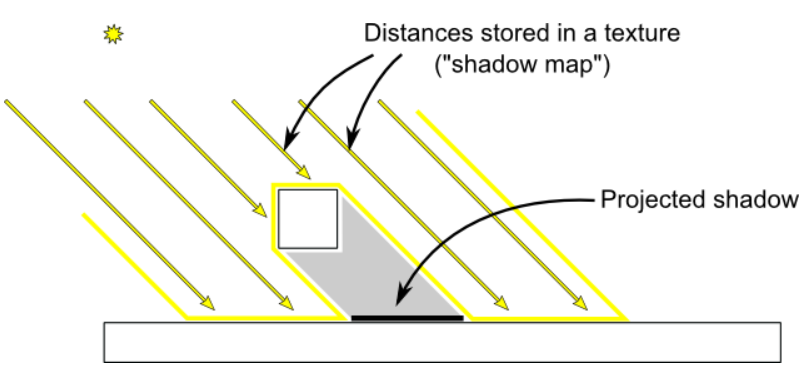
基本的阴影贴图算法分为两步。首先,从灯光的角度渲染场景。仅计算每个片段的深度。接下来,场景将照常渲染,但需要进行额外的测试以查看当前片段是否在阴影中。
“在阴影中”测试实际上很简单。如果当前样本在同一点上比阴影贴图离灯光更远,这意味着场景包含一个离灯光更近的对象。换句话说,当前片段处于阴影中。
下图可能有助于您理解原理:

渲染阴影贴图
在本教程中,我们将只考虑平行光——距离如此之远,以至于所有光线都可以被视为平行的光。因此,渲染阴影贴图是使用正交投影矩阵完成的。正交矩阵就像通常的透视投影矩阵一样,只是不考虑透视——无论物体在相机附近还是远处,它看起来都是一样的。
设置渲染目标和MVP矩阵
在这里,我们使用1024x1024 16位深度纹理来包含阴影贴图。对于阴影贴图,16位通常就足够了。请随意尝试这些值。请注意,我们使用的是深度纹理,而不是深度渲染缓冲区,因为我们稍后需要对其进行采样。
// The framebuffer, which regroups 0, 1, or more textures, and 0 or 1 depth buffer.
 GLuint FramebufferName = 0;
 glGenFramebuffers(1, &FramebufferName);
 glBindFramebuffer(GL_FRAMEBUFFER, FramebufferName);

 // Depth texture. Slower than a depth buffer, but you can sample it later in your shader
 GLuint depthTexture;
 glGenTextures(1, &depthTexture);
 glBindTexture(GL_TEXTURE_2D, depthTexture);
 glTexImage2D(GL_TEXTURE_2D, 0,GL_DEPTH_COMPONENT16, 1024, 1024, 0,GL_DEPTH_COMPONENT, GL_FLOAT, 0);
 glTexParameteri(GL_TEXTURE_2D, GL_TEXTURE_MAG_FILTER, GL_NEAREST);
 glTexParameteri(GL_TEXTURE_2D, GL_TEXTURE_MIN_FILTER, GL_NEAREST);
 glTexParameteri(GL_TEXTURE_2D, GL_TEXTURE_WRAP_S, GL_CLAMP_TO_EDGE);
 glTexParameteri(GL_TEXTURE_2D, GL_TEXTURE_WRAP_T, GL_CLAMP_TO_EDGE);

 glFramebufferTexture(GL_FRAMEBUFFER, GL_DEPTH_ATTACHMENT, depthTexture, 0);

 glDrawBuffer(GL_NONE); // No color buffer is drawn to.

 // Always check that our framebuffer is ok
 if(glCheckFramebufferStatus(GL_FRAMEBUFFER) != GL_FRAMEBUFFER_COMPLETE)
 return false;
用于从灯光的视角渲染场景的MVP矩阵计算如下:
glm::vec3 lightInvDir = glm::vec3(0.5f,2,2);

 // Compute the MVP matrix from the light's point of view
 glm::mat4 depthProjectionMatrix = glm::ortho<float>(-10,10,-10,10,-10,20);
 glm::mat4 depthViewMatrix = glm::lookAt(lightInvDir, glm::vec3(0,0,0), glm::vec3(0,1,0));
 glm::mat4 depthModelMatrix = glm::mat4(1.0);
 glm::mat4 depthMVP = depthProjectionMatrix * depthViewMatrix * depthModelMatrix;

 // Send our transformation to the currently bound shader,
 // in the "MVP" uniform
 glUniformMatrix4fv(depthMatrixID, 1, GL_FALSE, &depthMVP[0][0])
着色器
此过程中使用的着色器非常简单。顶点着色器是一个传递着色器,它简单地计算顶点在齐次坐标系中的位置:
#version 330 core

// Input vertex data, different for all executions of this shader.
layout(location = 0) in vec3 vertexPosition_modelspace;

// Values that stay constant for the whole mesh.
uniform mat4 depthMVP;

void main(){
 gl_Position =  depthMVP * vec4(vertexPosition_modelspace,1);
}
片段着色器同样简单:它只是在位置0(即在我们的深度纹理中)写入片段的深度。
#version 330 core

// Ouput data
layout(location = 0) out float fragmentdepth;

void main(){
    // Not really needed, OpenGL does it anyway
    fragmentdepth = gl_FragCoord.z;
}
渲染阴影贴图的速度通常是普通渲染的两倍多,因为只写入低精度深度,而不是深度和颜色;内存带宽通常是GPU上最大的性能问题。
结果
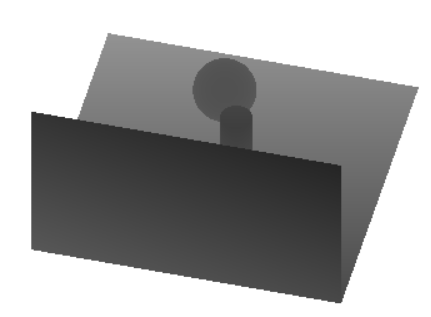
生成的纹理看起来像这样:

原文:https://www.opengl-tutorial.org/intermediate-tutorials/tutorial-16-shadow-mapping/#basic-shadowmap